Some people love having espresso first thing in the morning, but some like something to go with it. The taste of coffee isn’t for everyone, but even those who don’t like it can enjoy a delicious latte or cappuccino.
A milk frother is an essential kitchen tool for anyone who loves coffee drinks but doesn’t like the extra work involved in making them. A frother can make a thick, creamy foam in just a few minutes. The milk frother, as the name implies, can make milk into a thick foam to enhance the taste and appearance of your coffee.
In addition to aerating milk, it produces tiny microbubbles that give the milk a light, creamy texture. In the world of coffee, milk frothers are a remarkable invention. However, it is critical to choose electric milk frothers that are capable of completing this task.
Nespresso is a brand known for its high-quality products. The coffee world knows how efficient and convenient its coffee machines are. The best device you can pair with it is its milk frother. You can have an espresso shot on its own or make delicious milk-based drinks at home, using the milk frother to add frothed milk. There’s tough competition between its Aeroccino 3 and Aeroccino 4, so we will guide you to choose the best.
This article is an in-depth analysis between Nespresso Aeroccino 3 and Nespresso Aeroccino 4. Before choosing between these two, go through the strengths and weaknesses in this article to find out what will suit you the best. This article contains their comparison in features, value for money, performance, and more.
What is a Nespresso Milk Frother?
A Nespresso Milk Frother will become your kitchen staple as soon as you bring it home. It is as convenient and efficient as the Nespresso coffee machine. Without wasting your time and money in Starbucks, you can enjoy creamy and tasty coffee at home by being your barista.
The Nespresso milk frother prepares the most richly textured, creamy, and foamy frothed milk for your lattes, cappuccino, or hot chocolate. Aeroccino 3 and 4 have very close competition. The Aeroccino 3 is cost-effective and durable. On the other hand, the Aeroccino 4 is more versatile and creates a thicker foam.
How are Frothed and Steamed Milk Different?
Milk goes through an aeration process to get frothed. The aeration of milk turns it into a foamy and frothy textured liquid. It is an essential ingredient in some hot and cold drinks like a cappuccino to make it creamy, thick, and foamy. A frother is the most convenient way to make frothed milk within a few minutes.
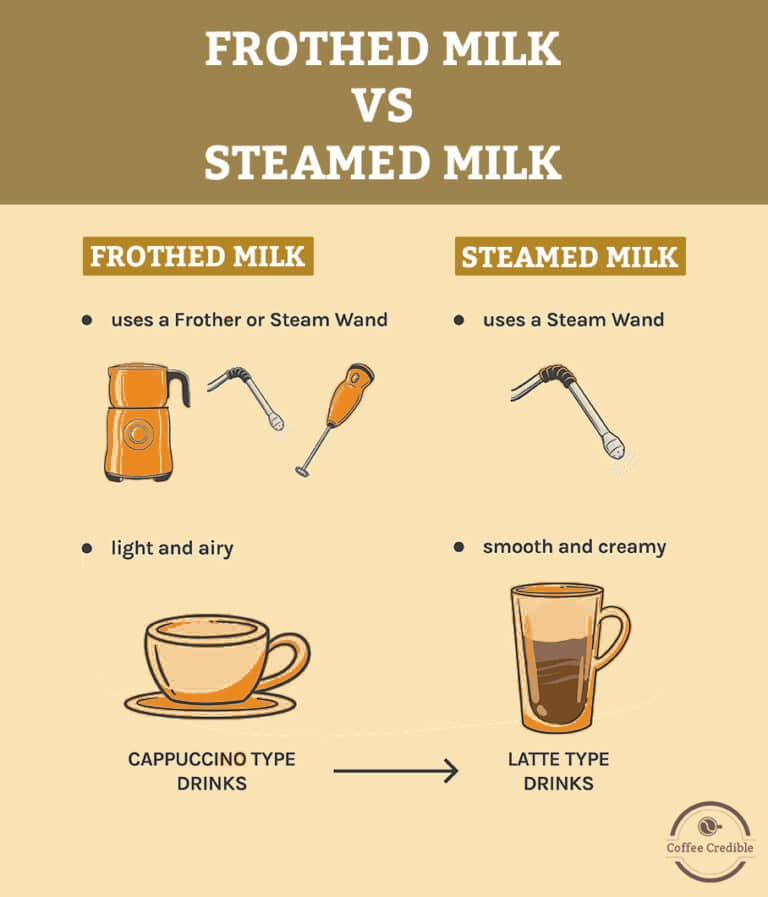
Steamed milk gives the milk a foamy texture which makes it heavier but doesn’t make it frothy. It is lighter than frothed milk and gives a velvety texture to the drinks. Beverages like lattes and mocha are incomplete without steamed milk. It is prepared at a higher temperature and pressure using a steam wand. Any espresso machine can make steamed milk with its steam wand, or you can buy a steamer separately.
Nespresso Aeroccino 3 Review
Here we discuss the features, specifications, usage, pros, and cons of Nespresso Aeroccino 3 in detail.
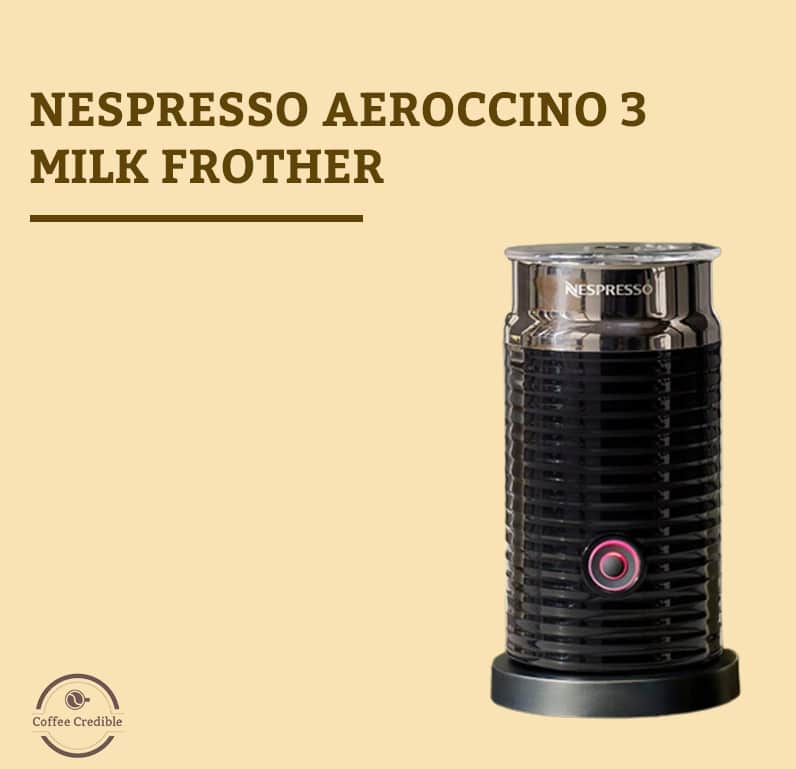
Overview
In 2012, Nespresso introduced the advanced version of its Aeroccino milk frother, called the Aeroccino 3. Enhance your beverage experience to a professional level by using this device. It is cost-effective, durable, and easy to use. Using one button, you can make hot milk foam or cold froth and create delicious coffee recipes.
How to Use Nespresso Aeroccino 3 Milk frother?
- Put the whisk on the base.
- Plug in the frother to a power source.
- Pour the required amount of milk into it.
- Press the power button.
- If you want hot foam, press the button for 1 second.
- If you are preparing cold foam, press 2 seconds.
- The device will automatically stop after frothing the milk.
Pros | Cons |
|
|
|
|
|
|
|
 It is affordable.
 It is not dishwasher safe.
Nespresso Aeroccino 4 Review
Here we discuss the features, specifications, usage, pros, and cons of Nespresso Aeroccino 4 in detail.
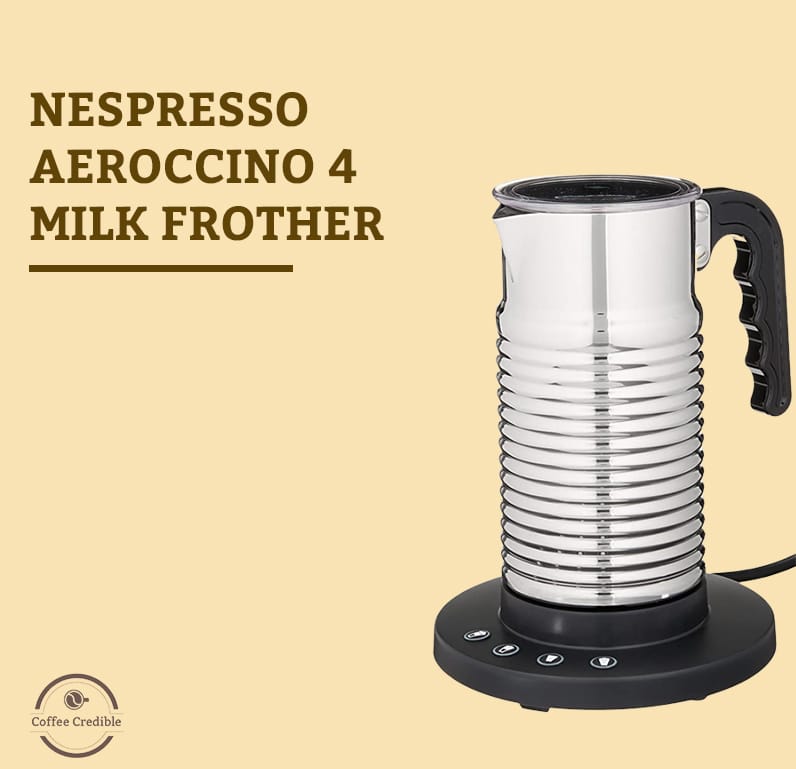
Overview
Aeroccino 4 came into the market in 2016. In terms of coffee experience, Nespresso Aeroccino 4 is a game changer. It can make a variety of beverages by incorporating hot milk froth or cold milk foam. The versatility of this model makes it stand out among all other options of milk frothers.
How to Use Nespresso Aeroccino 4 Milk Frother ?
- If your machine is new, clean it with a damp cloth before using it.
- Attach the jug to its base and connect it to a power source.
- Pour the milk into it.
- Close the lid.
- Press a specific button, Depending on whether you want cold froth, hot milk, or milk for a cappuccino or a latte.
- Wait for a few seconds till the machine stops automatically.
- Pour the frothed milk into your drink and enjoy!
Pros | Cons |
|
|
|
|
| |
| |
|
How are Nespresso Aeroccino 3 and 4 Milk Frothers Different?
In the following table, we analyze the specifications of Aeroccino 3 and 4 to know their differences.
Specification | Nespresso Aeroccino 3 | Nespresso Aeroccino 4 |
 |  | |
Weight | 1.9 pounds | 2.3 pounds |
Capacity |
|
|
Hot Froth | Yes |
|
Cold Froth | Yes | Yes |
Dimensions (W x D x H) | 4.5 x 4.5 x 7.75 | 7.1 x 7.1 x 8.3 |
Exterior |
|
|
Whisk |
|
|
Temperature | 160°F and 170°F | 152°F |
Noise | No | No |
Material | Non-stick | Non-stick |
Power Supply | 550W | 490W |
Heating Time |
|
|
Milk Recommendations |
|
|
Price | $74 | $119 |
What Should You Know Before Buying a Milk Frother?
We recommend keeping the following considerations in mind before buying a milk frother:
Price
Before buying a frother, consider if it fits your budget and if it will be worth the money. Aeroccino 4 is more versatile than Aeroccino 3, but it is expensive.
Design
Before buying a frother, you must know which device will suit the best in your space. If you have a small kitchen, you must look for a frother that takes less counter space but works efficiently.
Quality of Foam
There’s no need to buy a frother that does not produce good quality foam. If you are ready to compromise on the foam quality, you should not buy a frother and use a hand whisk instead.
Capacity
You must know how much capacity your milk frother has. It will help you determine the size of your lattes or cappuccinos. Every frother has a line inside the container that determines the maximum level of milk it can contain before and after frothing.
Durability
Investing in a milk frother is only worth it if it works well for a long time. There is no good in purchasing a device that doesn’t last a year. A Nespresso frother comes with a warranty and also provides a repair facility.
Cleaning
A frother requires cleaning after every use. Aeroccino 4 is comparatively easier to clean because it is dishwasher safe.
Nespresso Aeroccino 3 and 4: Who is the Winner?
Nespresso Aeroccino 3 and 4 are both exceptional at their job. We will help you choose the right one that suits your preference and fulfills your expectations of making the perfect milk froth.
Performance:
Both models have lots of functions and perform equally well. However, Aeroccino 4 has versatile foaming options and works rapidly. Being the latest model of Nespresso Frothers, it has all the qualities one looks for in a milk frother.
Winner: Aeroccino 4
Price:
Aeroccino 4 wins in performance and features, but it is not for anyone. The Aeroccino 3 is way cheaper and does the job. If you can compromise on some of the latest features in a frother, you should buy the cheaper one.
Winner: Aeroccino 3
Foam Quality:
Aeroccino 3 makes good milk foam, but it is more on the thin side. On the other hand, Aeroccino 4 makes thick, rich, and creamy milk foam of different types. The foam quality is far better when you froth milk in an Aeroccino 4.
Winner: Aeroccino 4
Ease of use:
Aeroccino 4 is easy to use and handle because it has several buttons, each having a different function. All four buttons present on the frother do a different job and you can easily decide which one will work for you. On the other hand, Aeroccino 3 has one operating button, and it becomes tricky to use it according to the type of foam you want.
Winner : Aeroccino 4
Which Milk is Best for Frothing?
While frothing low-fat and skim milk creates large air bubbles and prepares lighter foam. We recommend using whole milk to have the perfect thick and creamy milk foam. While using whole milk, the frother will produce smaller air bubbles, making the best foam for lattes and cappuccinos. If you have allergies to milk, or you avoid it anyways, you can use almond, soy, or oat milk, but they will make thin foam due to the low-fat content.
How to Clean a Nespresso Milk Frother?
Nespresso states that it requires cleaning after every use. When you froth milk, a thick layer sticks to the device and needs cleaning. If you don’t clean it after every use, milk dries down in the container.
Here are a few simple steps to clean your frother:
- Switch it off and take it off the base.
- Open the lid and remove the seal from it.
- Detach the whisk.
- If you have Aeroccino 4, put it in the dishwasher.
- If you have Aeroccino 3, follow the next steps.
- Rinse all parts with water.
- Clean the inside of the device with a non-abrasive sponge.
- Dry your milk frother with a clean cloth and put all the parts back together.
- It is ready to use.
Note: Let the frother cool down before cleaning, and never use sharp or abrasive tools to clean the frother.
The Bottom Line
There is no doubt that both frothing machines are excellent and work wonders. You can choose the type of product depending on your taste and needs. The Nespresso Aeroccino 4 Milk Frother is convenient for making different coffee cups, and you don’t have to worry about the long cleaning process.
On the other hand, If you don’t want to update your coffee experience because multiple operations confuse you and you are looking for a budget-friendly device, opt for Aeroccino 3. In many ways, the Nespresso Aeroccino 4 is an upgrade over the previous model, but only if the additional features are worth it to you. Those features may not be worth it for some people, so they would be better off saving their money for more coffee. Whatever you choose, you’ll have a quality frother that will make your espresso drinks taste amazing!
Keep Reading

![17 Best Nespresso Pods [Tried & Tested]](https://coffeecredible.com/wp-content/uploads/2022/07/best-nespresso-pods.jpg)