You’ve been drinking too much coffee this week, and now you feel like the taste is getting worse, but you cannot figure out why. Don’t worry. It’s usually the needle that has built-up grime that needs cleaning.
This guide will give you simple steps on how to clean a Keurig needle so you can get back to that sweet, sweet coffee.
Keurig Needle maintenance is essential to your coffee machine’s cleaning cycle. If you ignore it, you will have the remains of coffee clogged in the needle, resulting in a bitter taste.
Let’s not waste time and jump straight into the steps that will guide you to cleaning your needle, so it’s like new!
- The Keurig needle is an important part of the coffee brewing system as it pierces the K-cup foil to release the coffee grounds inside from the top to the bottom.
- If you don’t clean a Keurig needle, your coffee may taste stale, or even worse, the machine may stop working altogether.
- Before cleaning, you should turn off and cool down the machine.
- While using the Keurig Cleaning Tool and the rinse pods you should follow the steps like a pro.
- If you are using a paper clip, be careful with its sharp edges and sensitive body which can be damaged if excessive pressure is applied.
- If cleaning the needle doesn’t work, you can run a descaling cycle on your Keurig for deep cleaning, or else contact Keurig Customer Support at 866-901-2739.
Purpose of the Needle:
The Keurig needle is essential to the machine’s brewing system as it pierces the K-cup foil to extract the ground coffee.
There are two needles, one creates a hole at the top of the K-cup (entrance needle), and the other creates a hole at the bottom of the needle (exit needle).
With time, coffee grounds and other residues may accumulate in the needles, resulting in clogging.
Importance of Cleaning the Needle:
If you don’t clean it regularly, you can taste the clogged coffee in your cup, or worst case, the machine can stop making coffee altogether.
The clogged pores can prevent the water flow from entering the coffee pod resulting in no coffee extraction. AND NO COFFEE!
So if you notice a sudden reduction in the amount of coffee, this can indicate that it’s time to clean the needle. Other signs include the K-cup blowing up or the machine might sputter, leading to the machine stopping altogether.
As part of your usual cleaning routine, you should clean the Keurig exit and entrance needles at least once every month.
Important Safety Tips Before Cleaning the Needle:
Before starting the process, ensure your machine is turned off and has been sitting for at least 10 minutes so the brewer can cool down.
Then while cleaning the needle, you should hold the pod holder upside-down to make it easier for the clogged coffee to slip out.
Keurig needles are incredibly sharp and dangerous. So, it would be best to use extreme caution when cleaning or unclogging them.
Also, don’t apply too much force on the needles as they are sensitive parts of the brewing system, and if damaged, the machine cannot work.
Things You Should Have Before Cleaning Your Keurig Needle:
Using a paper clip is the easiest way to clean your Keurig without a specific tool. But with that, you need to be careful while cleaning the needle because it is sharp. Also, putting too much pressure on the needle could seriously damage it.
But if it’s too time-consuming, you can use a Keurig 2.0 Needle Cleaning Tool to remove stacked coffee grounds in the needle.

Another option is to use Keurig Rinse pods that are compatible with both 1.0 and 2.0 Keurig models.

These options should help you get your coffee tasting back to how it should taste!
Keurig Needle Cleaning (A Step-By-Step Guide):
Once you get the Keurig Needle Cleaning tool and the rinse pod, you can start the process.

Using Cleaning Tool & Rinse Pod:
- Ensure that your Keurig machine is turned off and unplugged.
- Add water to the cleaning tool.
- Lift the brew head up and insert the rinse pod into the capsule holder.
- Make sure the green power button indication icon is positioned to the right and that the arrow indicators are pointing in your direction.
- The brew lever should then be shut down before being opened and shut five more times. The Keurig K-cup machine’s needle is being cleaned by this repeating motion.
- Open the brewing compartment once more, and take out the pod.
- You should be able to see dirt, gunk, and coffee grounds inside of it if you look closely.
- Close the brew head lever after running three clean water cycles.
- To make sure that all grounds and debris are completely drained out of the device, the Keurig uses a repeated motion to clean the needle inside the device.
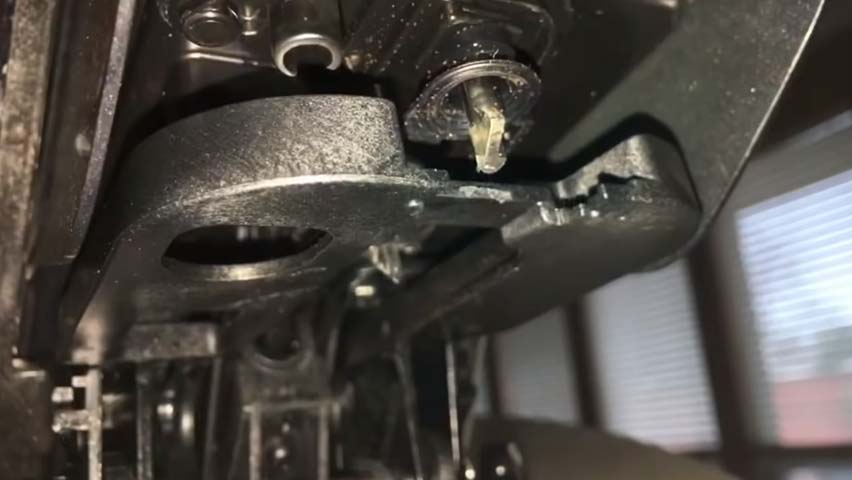
Using a Paper Clip:
- Turn off the machine and leave it at rest for 10 mins to cool down.
- Open the brew head.
- Grab your paper clip and smoothly move it around the needle.
- You can see the gunk in there beginning to collect on the paper clip.
- If you are satisfied, you can use the machine again. If not, you can use a cleaning pod and run a cycle into the machine so that you can get rid of the dirt completely.
Bottom Line:
Maintaining your machine is very important to keep it up and running. A little laziness and you can find yourself in big trouble that can ultimately affect the functionality of your Keurig.
Even if you drink coffee sparingly, you should keep a check on your machine before using it for better-tasting coffee and a more efficient brew.
FAQs
Why Does the Keurig Spit Out Coffee Grounds in My Cup?
Your Keurig brewing needle is clogged with coffee grounds, and it would be best if you cleaned it using a Keurig 2.0 Cleaning Tool or Keurig Rinse Pods.
If you have time constraints and don’t want to spend money, you can use a paper clip to clean around the needle and get some of the gunk out.
What happens if cleaning the needle doesn’t work?
If cleaning the needle doesn’t fix the issue, you can run a complete descaling cycle on your machine for deep cleaning.
If that doesn’t work, you should call Keurig Customer Support at 866-901-2739.
How is a Keurig needle disassembled?
- Remove the portion pack holder from the Assembly.
- Lift the brew head.
- Grasp the portion of the top handle with one hand while pushing up the bottom of the assembly from underneath with the other until it releases.
- Remove the funnel from the portion pack holder.
- Locate the hole on the bottom of the exit needle.
Why does it keep saying “needle under pressure” on my Keurig?
Coffee grounds are blown up by the piercing needle and jammed by the pressure of the k-cup, causing this to occur.
Open the needle and straighten out a small paper clip (if it is totally blocked). After that, pour some water through it while removing the K-cup to remove the loose grounds.
How is the check valve on a Keurig needle cleaned?
You can clean the check valve by running water or vinegar through it, when it’s flowing freely, you can attach it back and make your coffee easily.